Ubuntu 24.04 + Nginx + PHP8.3 + WordPress + SSL化 でサイトを構築する
目次
概要
- VPSサーバーを借り、Wordpressをインストールし、サイトを公開したいと思う方向けの記事です。
- ApacheではなくNginxを使います。
- Https化(SSL化)まで行います。
- この記事は2024年8月時点です。Wordpress, phpなどのバージョンアップでこの記事通りにならない可能性があります。
構築環境等
- Xserver VPS
- Ubuntu 24.04
- Nginx
- PHP 8.3
- MySQL
- Let’s Encrypt
VPSの環境
今回は2GBプランを利用します。Xserverで一番安くてコスパが良いです。(下画像は2024/8/11時点でのキャンペーン)
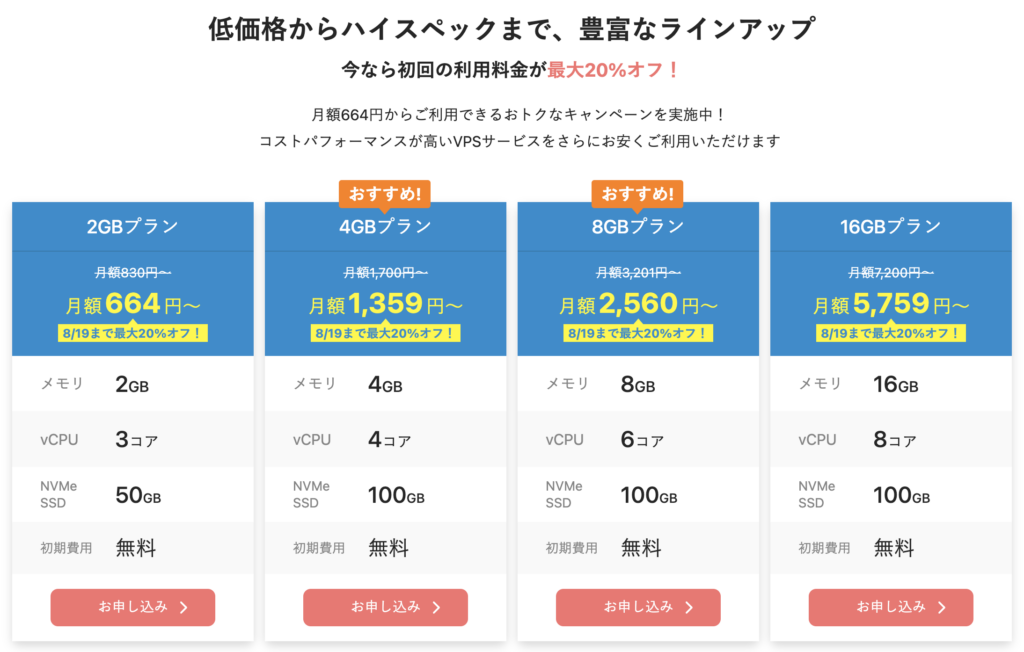
- メモリ:2GB
- vCPU:3コア
- NVMe SSD:50GB
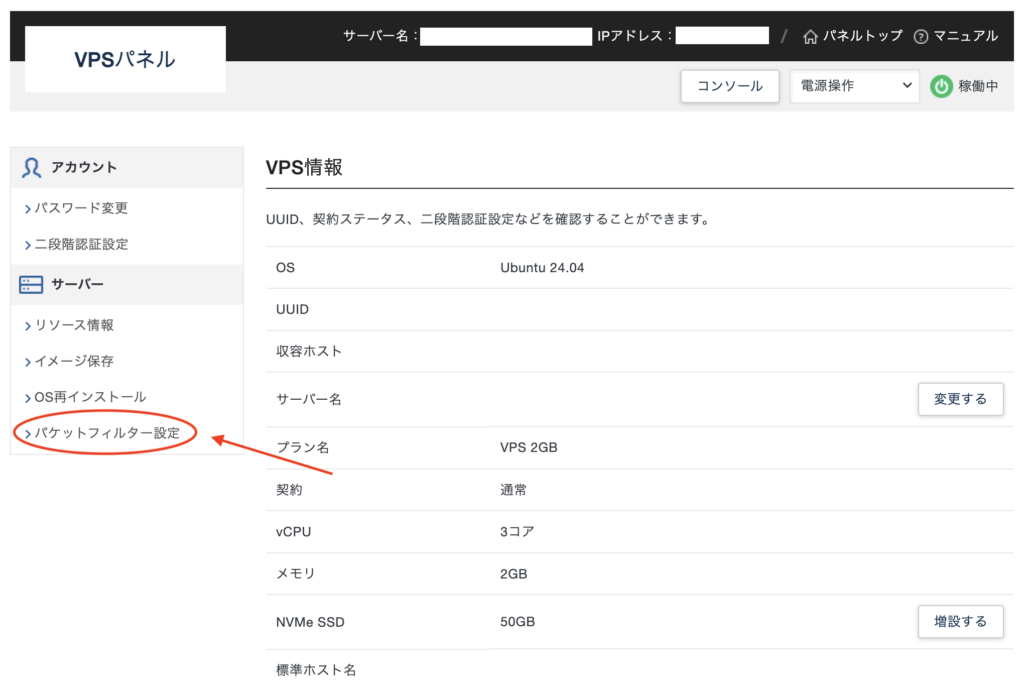
VPSパネル > パケットフィルター設定
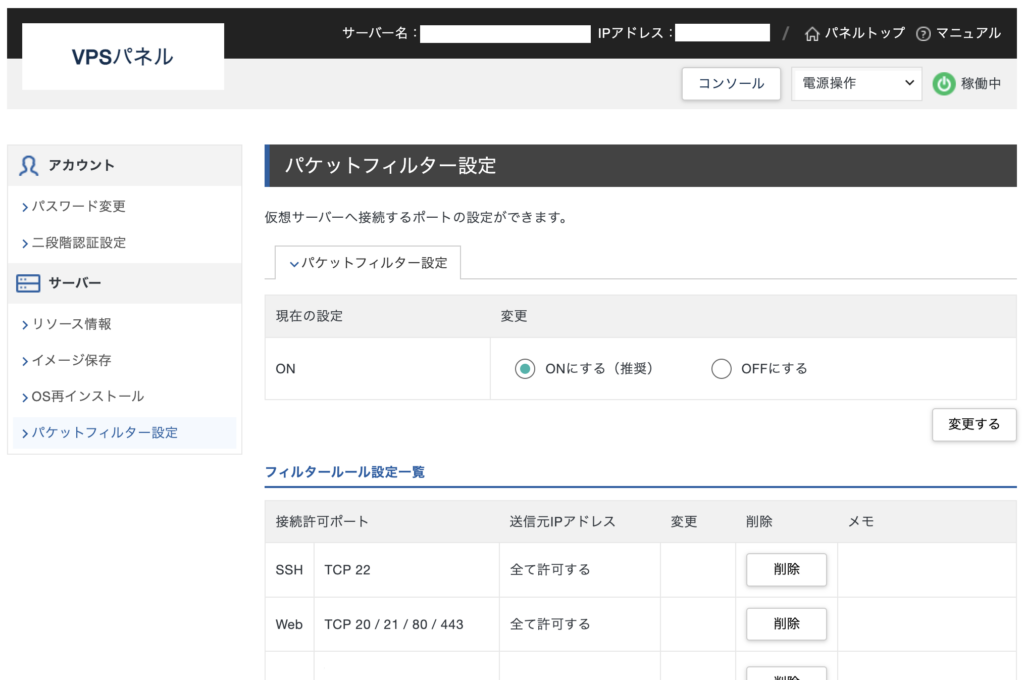
フィルタールール設定一覧で「SSH」と「Web」を許可しておきます。
この記事ではSSH接続に関する内容は省略します。
ユーザー作成
wordpressというユーザーを作成します。
Full Name 〜Otherまでは空白で問題ないです。
sudo adduser wordpress[sudo] password for ubuntu:
Adding user `wordpress' ...
Adding new group `wordpress' (1001) ...
Adding new user `wordpress' (1001) with group `wordpress' ...
Creating home directory `/home/wordpress' ...
Copying files from `/etc/skel' ...
New password:
Retype new password:
passwd: password updated successfully
Changing the user information for wordpress
Enter the new value, or press ENTER for the default
Full Name []:
Room Number []:
Work Phone []:
Home Phone []:
Other []:
Is the information correct? [Y/n] y作成したwordpressユーザーに、sudo権限を与えます。
sudo usermod -aG sudo wordpressSSHからwordpressユーザーでログインします。
ssh wordpress@サーバーのIPアドレスログインできたら、パッケージの更新とアップグレードを行っておきます。
sudo apt update -y
sudo apt upgrade -y
Nginxの導入
Nginxのインストールします。
sudo apt install nginx -yNginxを起動します。
sudo systemctl start nginxNginxを自動起動設定します。
sudo systemctl enable nginxNginxのルートディレクトリの確認をします。
grep "root /" -r /etc/nginx//etc/nginx/sites-available/default: root /var/www/html;
/etc/nginx/sites-available/default:# root /var/www/example.com;PHPの導入
phpのインストールをします。
sudo apt install php -y2024/8/11ではphp8.3がインストールされました。
php-fpmとphp-mysqlのインストールをします。
sudo apt install php-fpm php-mysql -yファイルのアップロードのサイズの上限を変更します。
/etc/php/8.3(phpのバージョン)/fpm/php.iniをvimで開きます。
それぞれ128Mにします。(iniの行数が多いので検索機能を使うと良いです。)
sudo vim /etc/php/8.3/fpm/php.ini/etc/php/8.3/fpm/php.ini
upload_max_filesize = 2M
↓
upload_max_filesize = 128M

post_max_size = 8M
↓
post_max_size = 128M
Apache2を削除します。phpをインストールしたときに自動でApache2がインストールされますが今回は使わないので削除します。
sudo apt remove apache2 -y
sudo apt purge apache2 -y
sudo rm -rf /etc/apache2
Nginxを再起動します。
sudo systemctl restart nginxNginxの設定
/var/www/wordpressにwordpressファイルを置きます。
シンボリックリンクの設定をします。
sudo ln -s /etc/nginx/sites-available/wordpress /etc/nginx/sites-enabled/
sudo vim /etc/nginx/sites-available/wordpress
以下を設定します。
fastcgi_pass unix:/run/php/php8.*-fpm.sock;
はphpのバージョンに合わせてください。
/etc/nginx/sites-available/wordpress
server {
   listen 80;

   server_name サーバーのIPアドレス;

   client_max_body_size 128M;
   root /var/www/wordpress;
   index index.php;

   location / {
       try_files $uri $uri/ /index.php?$args;
   }

   location ~ \.php$ {
       include snippets/fastcgi-php.conf;
       fastcgi_pass unix:/run/php/php8.3-fpm.sock;
   }
}
PHPの動作を確認
wordpress フォルダを作成します。
sudo mkdir /var/www/wordpressinfo.phpを作成します。
sudo vim /var/www/wordpress/info.php/var/www/wordpress/info.php
<?php phpinfo();Nginxを再起動します。
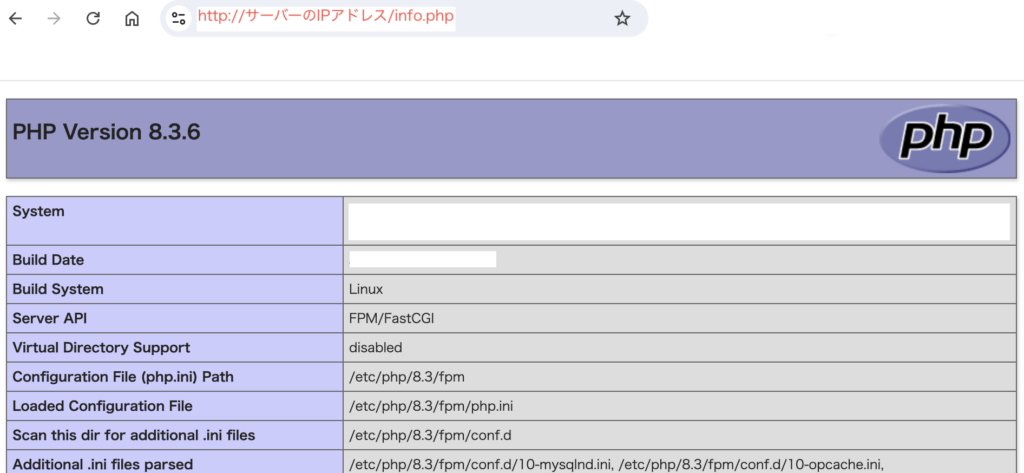
sudo systemctl restart nginxwebブラウザでサーバーのIPアドレス/info.phpで以下のような画面が表示されるかを確認します。
http://サーバーのIPアドレス/info.php
MySQLの設定
MySQLをインストールします。
sudo apt install mysql-server mysql-client -yMySQLに接続します。
sudo mysql -u root -pパスワードを聞かれますがお好きなものに設定してください。空欄でも可です。
Enter password:データベース、ユーザー名、パスワード作成、ユーザーに権限を付与します。
CREATE DATABASE wordpress_db CHARACTER SET UTF8 COLLATE UTF8_BIN;Query OK, 1 row affected, 2 warnings (0.01 sec)CREATE USER 'wordpress'@'localhost' IDENTIFIED BY 'password';Query OK, 0 rows affected (0.03 sec)GRANT ALL ON wordpress_db.* to 'wordpress'@'localhost';Query OK, 0 rows affected (0.01 sec)WordPressの導入
先程作った/var/www/内のwordpressフォルダを一旦削除します。
sudo rm -rf /var/www/wordpresswordpressをwgetでダウンロードします。まずは、wgetをインストールします。
sudo apt install wget -ywordpressをダウンロードします。
cd /var/www/
sudo wget https://ja.wordpress.org/latest-ja.tar.gz
wordpressをダウンロードします。
cd /var/www/
sudo wget https://ja.wordpress.org/latest-ja.tar.gz
sudo tar -xzvf latest-ja.tar.gz
cd /var/www/wordpress/
wp-config.phpファイルを作成し、編集します。
sudo mv wp-config-sample.php wp-config.php
sudo vim /var/www/wordpress/wp-config.php
/var/www/wordpress/wp-config.php
// ** データベース設定 - この情報はホスティング先から入手してください。 ** //
/** WordPress のためのデータベース名 */
define( 'DB_NAME', 'wordpress_db' );

/** データベースのユーザー名 */
define( 'DB_USER', 'wordpress' );

/** データベースのパスワード */
define( 'DB_PASSWORD', 'password' );

/** データベースのホスト名 */
define( 'DB_HOST', 'localhost' );

/** データベースのテーブルを作成する際のデータベースの文字セット */
define( 'DB_CHARSET', 'utf8' );

/** データベースの照合順序 (ほとんどの場合変更する必要はありません) */
define( 'DB_COLLATE', '' );
wordpressフォルダの所有権を変更します。
sudo chown -R www-data:www-data /var/www/wordpressNginxを再起動します。
sudo chown -R www-data:www-data /var/www/wordpressWordPressの設定
http://サーバーのIPアドレス/ にアクセスします。
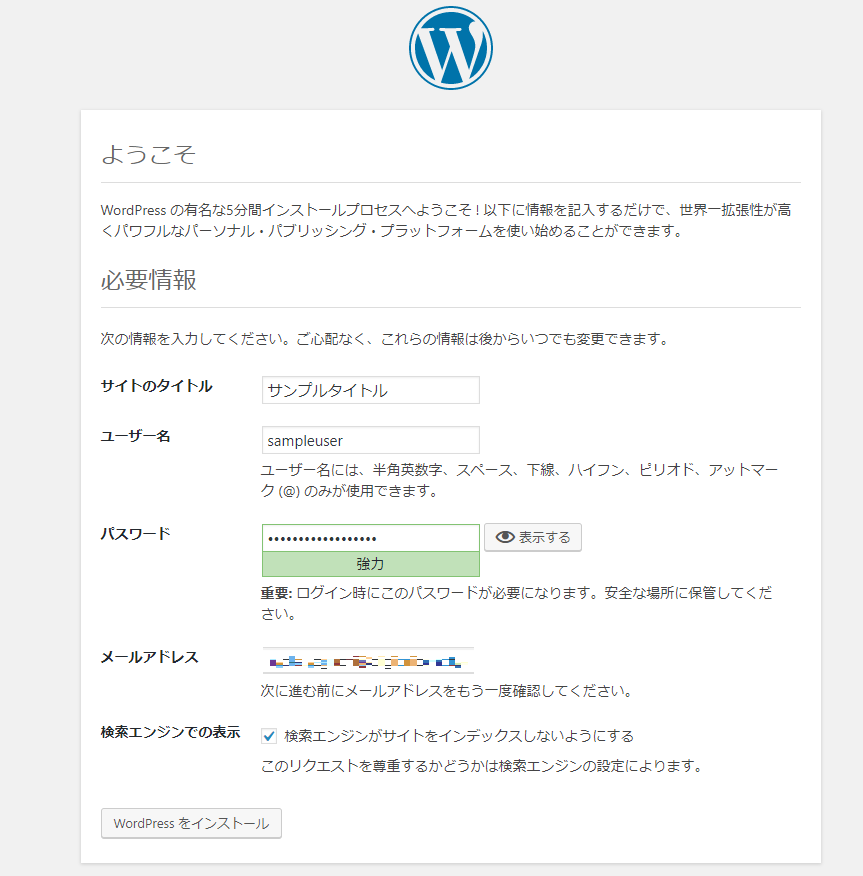
データベース接続確立エラー と表示された
→ MySQLで作成したユーザー名、パスワード、データベース名、wp-config.phpに書かれているユーザー名、パスワード、データベース名を確認しましょう。
必要事項を入力しWordPressをインストールします。
先程、設定したユーザー名とパスワードを入力しログインします。
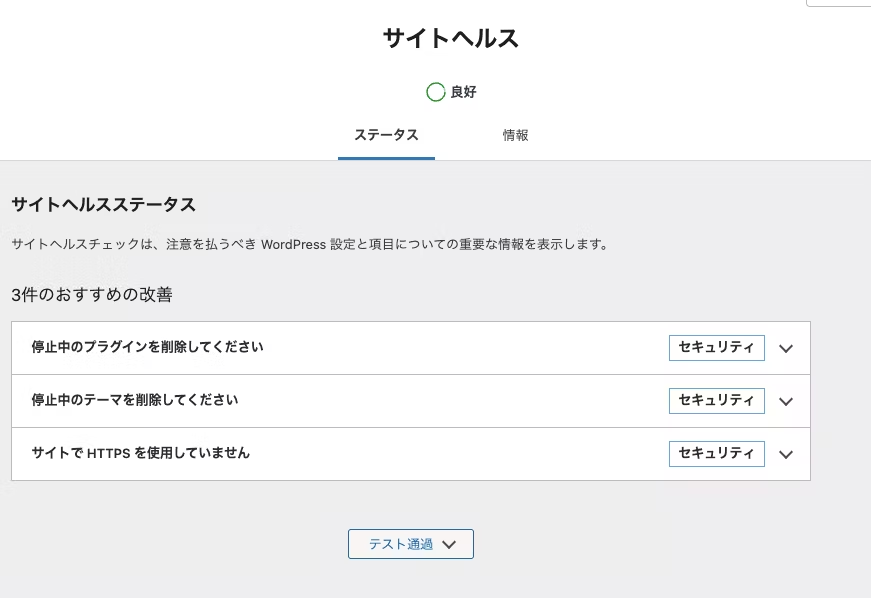
サイトヘルスステータスを良好にする
以下のphpのモジュールをインストールします。
sudo apt install php-curl php-dom php-gd php-imagick php-intl php-mbstring php-zip -yサイトヘルスステータスが良好になります。
SSL化
ドメインの設定
ドメインの設定をします。参考としてXserverドメインの設定例を紹介します。
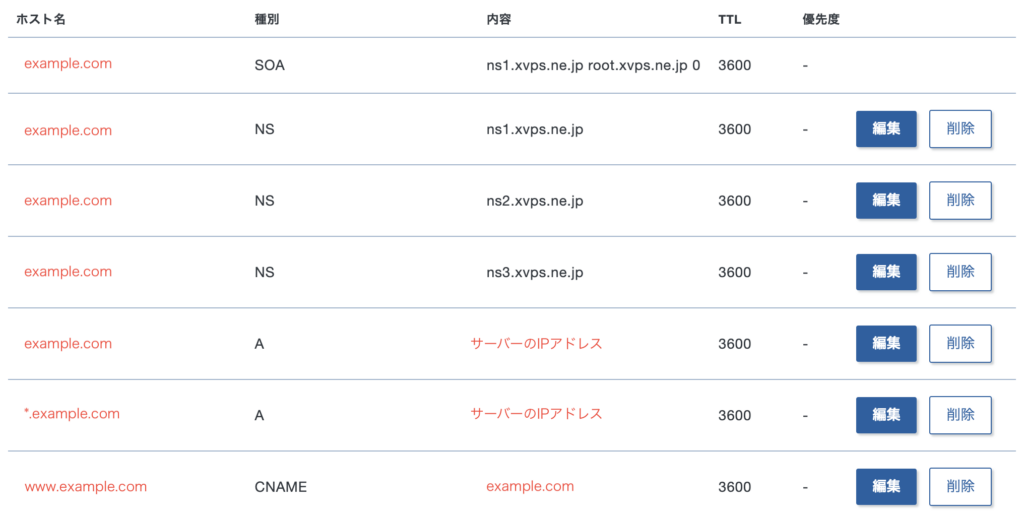
1〜4行目はネームサーバーの設定です。設定をすると初期に設定されていると思います。特に設定の変更をする必要はありません。
| ホスト名 | 種別 | 内容 | TTL |
| example.com | SOA | ns1.xvps.ne.jp root.xvps.ne.jp 0 | 3600 |
| example.com | NS | ns1.xvps.ne.jp | 3600 |
| example.com | NS | ns2.xvps.ne.jp | 3600 |
| example.com | NS | ns3.xvps.ne.jp | 3600 |
5〜7行目はAレコードなどです。この設定だと、example.comが基本のURLとなり、www.example.comはサブとなります。
| ホスト名 | 種別 | 内容 | TTL |
| example.com | A | サーバーのIPアドレス | 3600 |
| *.example.com | A | サーバーのIPアドレス | 3600 |
| www.example.com | CNAME | example.com | 3600 |
DNSレコードに登録されるまで時間がかかる(大体1時間ほど)ので次の作業をしましょう。
WordPressの設定変更
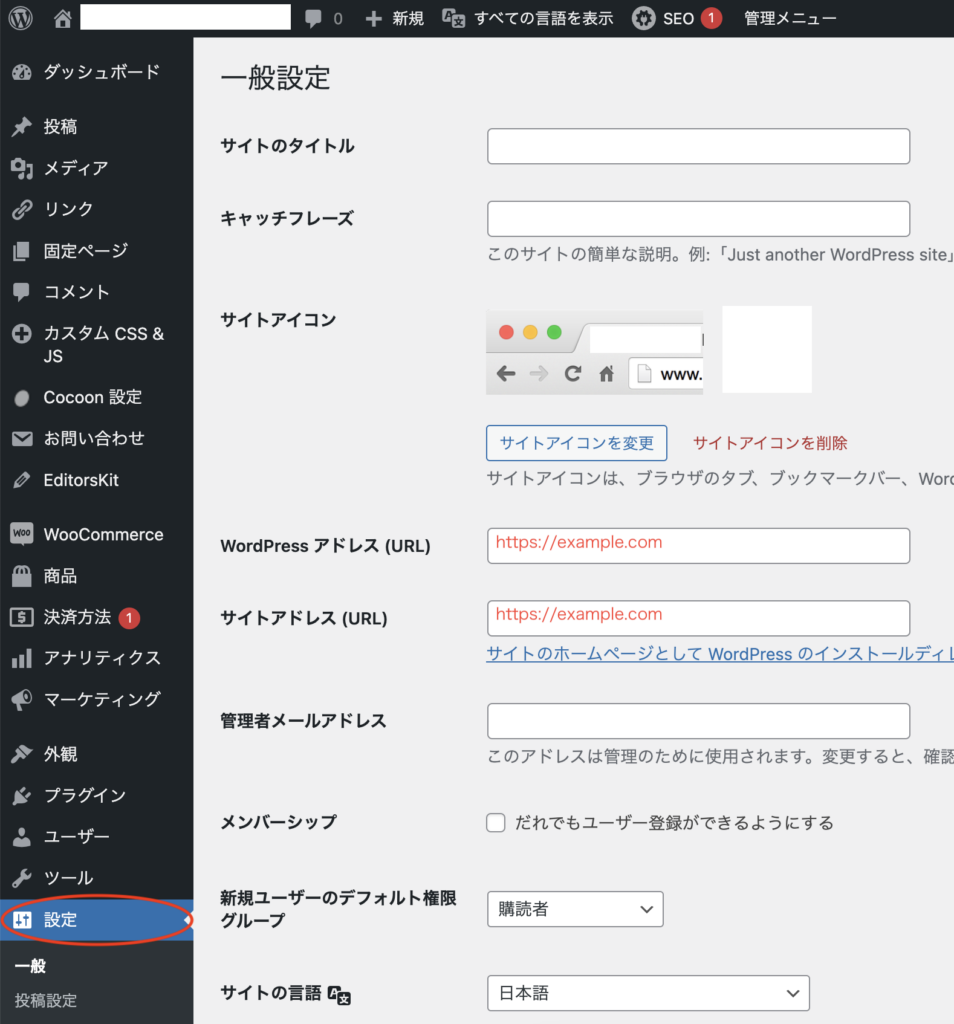
http://サーバーのIPアドレス/wp-admin/options-general.php
もしくは、左のメニューの設定を選択します。
WordPress アドレス(URL)とサイトアドレス(URL)を独自ドメインにhttps://をつけたものに設定してください。(例:https://example.com)
左下の設定を保存をクリックするとサイトにアクセスできなくなりますが問題ありません。サイトを閉じてもらって結構です。
Nginxの設定変更
Nginxの設定を変更します。
sudo vim /etc/nginx/sites-available/wordpress青字が変更点です。
/etc/nginx/sites-available/wordpress
server {
   listen 80;

   server_name example.com;

   client_max_body_size 128M;
   root /var/www/wordpress;
   index index.php;

   location / {
       try_files $uri $uri/ /index.php?$args;
   }

   location ~ \.php$ {
       include snippets/fastcgi-php.conf;
       fastcgi_pass unix:/run/php/php8.3-fpm.sock;
   }
}
Nginxを再起動します。
sudo systemctl restart nginxLet’s Encryptの導入
certbotをインストールします。
sudo apt install certbot python3-certbot-nginx -ycertbotを実行します。
sudo certbot --nginx -d example.comcertbotを実行するとメッセージが流れます。 メッセージに沿って必要な情報を入力してください。
以下の画面ではLet’s Encryptからのメールを受け取るメールアドレスについて情報を入力する必要があります。ご自身のメールアドレスを入力し「Enter」キーを押してください。
Saving debug log to /var/log/letsencrypt/letsencrypt.log
Enter email address (used for urgent renewal and security notices)
(Enter 'c' to cancel):
続いて、利用規約に同意する必要があります。「Y」キーを入力し、同意してください。
Please read the Terms of Service at
https://letsencrypt.org/documents/---.pdf.
You must agree in order to register with the ACME server. Do you agree?
最後に、Let’s Encryptのパートナーにメールアドレスの公開有無について答える必要があります。
公開しても良い場合には「Y」キー、公開したくない場合には「N」キーを入力し「Enter」キーを押してください。
Would you be willing. once your first certificate is successfully issued, to share your email address with Electronic Frontier Foundation, a founding partner of the Let's Encrypt project and the non-profit organization that develop Certbot? We'd like to send you email about our work encrypting the web, EFF news, campaign, and ways to support digital freedom.
(Y)es/(N)o:
「Successfully received certificate.」と表示されたら正常にSSL/TLS証明書の取得完了です。
取得された証明書は「/etc/letsencrypt/live/(ドメイン名)」に格納されます。
SSL/TLS証明書の自動更新
Let’s EncryptのSSL/TLS証明書の有効期限は3ヶ月であるため、期限が迫った際に自動で更新できるように設定することを推奨します。
本手順ではnanoエディターを利用して設定を行います。以下のコマンドを実行してください。
sudo nano /etc/cron.d/letsencrypt-renewcronジョブの設定値を入力し、保存してください。必要に応じてcronの実行頻度を変更することも可能です。
※下記の設定例では毎月1日の00時00分にSSL/TLS証明書を更新し、更新前後にWebサーバーの停止と起動を行っています。
0 0 1 * * root certbot renew --pre-hook "service nginx stop" --post-hook "service nginx start"設定後のファイル保存は「ctrl」と「x」キーを同時に入力してください。
「変更されたバッファを保存しますか?」と表示されるので、「y」キーを入力してください。
「書き込むファイル」にてファイルの指定に問題がなければ「enter」キーを入力し保存完了です。
cronを再起動し設定内容を反映させます。
sudo systemctl restart cronNginxの設定変更をする。SSL対応、wwwあり・なしを統合する。
Nginxの設定を変更します。
sudo vim /etc/nginx/sites-available/wordpress青字が変更点です。certbotを実行したことで一部はすでに追加されていると思います。
/etc/nginx/sites-available/wordpress
server {
   server_name example.com;

   client_max_body_size 128M;
   root /var/www/wordpress;
   index index.php;

   location / {
       try_files $uri $uri/ /index.php?$args;
   }

   location ~ \.php$ {
                include snippets/fastcgi-php.conf;
                fastcgi_pass unix:/run/php/php8.3-fpm.sock;
   }

   listen 443 ssl;
    ssl_certificate /etc/letsencrypt/live/example.com/fullchain.pem;
    ssl_certificate_key /etc/letsencrypt/live/example.com/privkey.pem;
    include /etc/letsencrypt/options-ssl-nginx.conf;
    ssl_dhparam /etc/letsencrypt/ssl-dhparams.pem;
}
server {
    if ($host = example.com) {
        return 301 https://$host$request_uri;
    }

    server_name example.com;
    listen 80;
}
server {
    if ($host = www.example.com) {
        return 301 https://example.com$request_uri;
    }

    server_name www.example.com;

    listen 80;
}
Nginxを再起動します。
sudo systemctl restart nginxこれで設定が終了です。
https://example.com/wp-login.phpにアクセスして正常にアクセスできるか確認してください。
アクセスできたら、サイトヘルスを確認し、以下の「サイトは有効なHTTPS接続を使用しています」のテストを通過しているか確認してください。

以上で作業は終了です!お疲れ様でした。


